How to work with Docker?
This guide serves as an explanation of how to use Docker with Memgraph and setting up your development environment.
Memgraph supports custom, user-written Cypher procedures. It is easy to extend built-in features by creating your own query modules. To access those query modules, we need to take a few extra steps while using Docker and this guide will show you how to work with them.
Why Docker?
Docker is a service that uses OS-level virtualization to deliver software in packages that are called containers. We at Memgraph chose Docker because of its many useful features:
- Flexibility
- Lightweight - efficient in terms of system resources
- Portable - you can build locally or deploy to the cloud
- Runs on all platforms - Windows, Linux and, macOS
- Deploy in Kubernetes
Setting up Memgraph with Docker
To start implementing and testing custom query modules in Memgraph, it is necessary to set up a Docker container first.
The Memgraph Docker image can be downloaded here.
After successfully installing Docker, import the Memgraph Docker image with the following command:
docker load -i /path/to/memgraph-<version>-docker.tar.gz
To start Memgraph, use the following command:
docker run -p 7687:7687 \
  -v mg_lib:/var/lib/memgraph \
  -v mg_log:/var/log/memgraph \
  -v mg_etc:/etc/memgraph \
  memgraph
At this point, Memgraph is ready for you to submit queries.
For an explanation of how to write custom query modules, follow our how-to guide.
Find the IP address of a Docker Container
Although unlikely, some users might experience minor difficulties after the
Docker installation. Instead of running on localhost, a Docker container for
Memgraph may be running on a custom IP address. Fortunately, that IP address can
be found as follows:
1. Determine the ID of the Memgraph Container by issuing the command docker
ps. The user should get an output similar to the following:
CONTAINER ID    IMAGE       COMMAND                  CREATED
9397623cd87e    memgraph    "/usr/lib/memgraph/m…"   2 seconds ago
At this point, it is important to remember the container ID of the Memgraph
Image. In our case, that is 9397623cd87e.
2. Use the this ID to retrieve the IP address of the Container:
- Linux
- macOS
- Windows
docker inspect -f '{{range.NetworkSettings.Networks}}{{.IPAddress}}{{end}}' 9397623cd87e
docker inspect -f '{{range.NetworkSettings.Networks}}{{.IPAddress}}{{end}}' 9397623cd87e
docker inspect -f "{{range.NetworkSettings.Networks}}{{.IPAddress}}{{end}}" 9397623cd87e
The command above will yield the IP address that should be used when connecting
to Memgraph via Memgraph Lab, mgconsole or mg_client as described in
the querying section. Just replace
HOST from the following command with the appropriate IP address:
docker run -it --entrypoint=mg_client memgraph --host HOST --use-ssl=False
Importing data
If you wish to test and run your procedures on a custom dataset, first you need to populate the database. We will be using the CSV Import Tool which creates a snapshot that will be used by the database to recover its state on its next startup. Make sure that your Memgraph container is stopped and run the importer using the following command:
docker run -v mg_lib:/var/lib/memgraph -v mg_etc:/etc/memgraph -v mg_import:/import-data \
  --entrypoint=mg_import_csv memgraph
You can pass CSV files containing nodes and relationships with --nodes and
--relationships flags respectively. Multiple files can be specified by
repeating either of the flags. At least one node needs to be specified, but
relationships are not required. For more information on how to structure your
CSV file, please refer to our Import tool
guide.
To import the snapshot, you will need to copy your files where Docker can see them by creating another container and filling it with your data:
docker container create --name mg_import_helper -v mg_import:/import-data busybox
docker cp nodes.csv mg_import_helper:/import-data
docker cp relationships.csv mg_import_helper:/import-data
docker rm mg_import_helper
To run the importer, we need to slightly modify the first command by adding the flags for nodes and relationships:
docker run -v mg_lib:/var/lib/memgraph -v mg_etc:/etc/memgraph -v mg_import:/import-data \
  --entrypoint=mg_import_csv memgraph \
  --nodes /import-data/nodes.csv \
  --relationships /import-data/relationships.csv
Next time you start Memgraph, your dataset will be ready for use!
Accessing query modules
Before running our custom procedures, we need to configure Memgraph to know
where to fetch query modules. By default, Memgraph will search for query modules
in the usr/lib/memgraph/query-modules directory. If you wish to change the
directory in which Memgraph searches for query modules, you can do it in one of
the following ways:
- change the
--query-modules-directoryflag in the main configuration file located at/etc/memgraph/memgraph.confor - supply it as a command-line parameter
When supplying the path for our query module, first we need to mount the volume containing it. Mounting is a process by which the operating system makes files and directories on a storage device available for users to access via the computer's file system. In our case, we are allowing an isolated environment of the Docker container to access data located in our computer's file system. There are two types of mounts in Docker: volume and bind mounting. The graphic below shows the differences between the two mounting techniques:
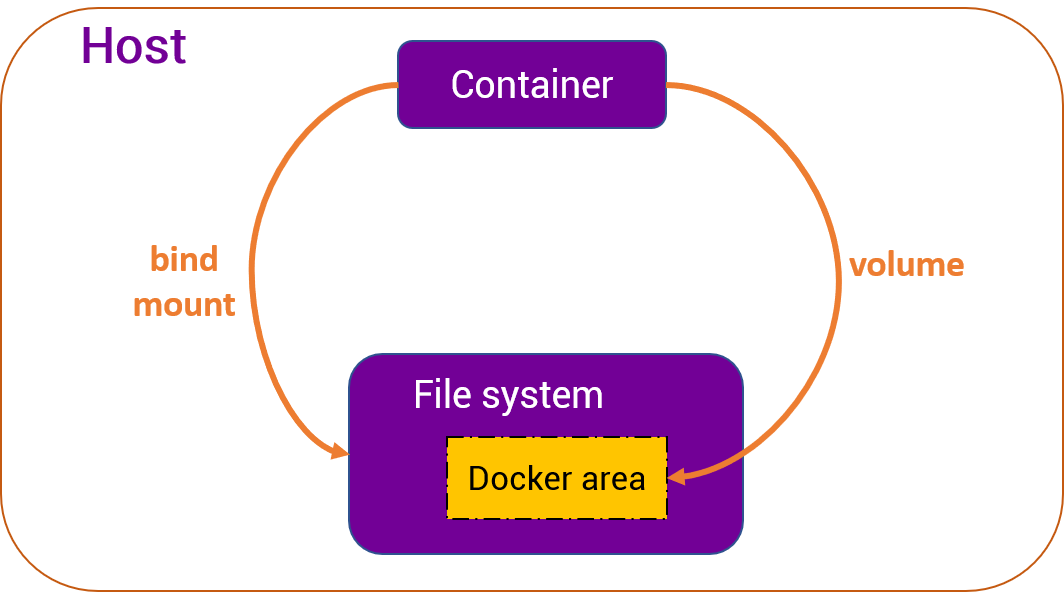
In context of Memgraph, we will use volume mounting meaning we are going to put our files in a container and mount that container to the Docker area. Bind mounts are dependant on the file system of the host machine therefore if we move the file elsewhere, we need to re-mount. With volume binding, we have placed the files inside the Docker area and Memgraph will always have access to it no matter where they exist in our file system.
The following command should be used to successfully mount a volume containing your custom query module:
docker run -p 7687:7687 \
  -v mg_lib:/var/lib/memgraph -v mg_log:/var/log/memgraph -v mg_etc:/etc/memgraph \
  -v $(pwd)/modules:/modules \
  --query-modules-directory=/modules
We've added two flags to the original command:
-v $(pwd)/modules:/modules- flag for mounting the volumemodulesand--query-modules-directory=/modules- flag used to change the place where Memgraph searches for modules.
Now that we have access to our query modules, we can go on and run them.
Running query modules
There are three ways to execute queries and procedures in Memgraph:
NOTE: mg_client is a deprecated tool still coming within the Memgraph package.
mgconsole will replace mg_client in
the future. If possible, please use mgconsole instead.
- using the command-line tool,
mg_client, which comes with Memgraph, (Querying) - programmatically by using the Bolt protocol,
- from Memgraph Lab, a visual user interface that can be downloaded here.
If you've decided to use the command-line tool, you will need to run the following command:
docker run -it --entrypoint=mg_client memgraph --host HOST --use-ssl=False
HOST part of the command should be replaced with valid IP - most likely it
being localhost. If you are a macOS or Linux user and are having issues with
connecting, please refer to the Note for Docker
users.
NOTE: If localhost refuses to connect, try putting host.docker.internal
instead.
After running the command, you should get a command prompt similar to this one:
Type :help for shell usage
Quit the shell by typing Ctrl-D(eof) or :quit
Connected to 'memgraph://127.0.0.1:7687'
memgraph>
Query modules are loaded on start, but you can also load them by executing the following procedure:
CALL mg.load_all();
Each time you change a query module don't forget to reload it. The syntax for calling the procedures is as follows:
CALL example.procedure("string-argument") YIELD *;
Each procedure returns either zero or more records, where each record contains
named fields. The YIELD part is used to select fields we are interested in.
Custom procedures may be called standalone or as part of a larger query. This is
useful if we want the procedure to work on data the query is producing.
With this, your developing environment is ready and you are able to easily implement and run your own query modules. Check out our Reference Guide to see which Query Modules are included in Memgraph.
Where to next?
To learn more about Memgraph's functionalities, visit the Reference guide. For real-world examples of how to use Memgraph, we strongly suggest going through one of the available Tutorials.